Monday, October 31, 2011

Halloween and Giveaway Reminder

We had a Halloween party at our church on Saturday and our amazing photographer neighbor took pictures of the kids in their costumes beforehand. I love how they turned out!

My son was a little grumpy so his pictures ended up being sad clown pictures. He is still adorable in them though. 

Also, just a reminder, TODAY is the LAST DAY to enter the giveaways at Family Ever After. Click HERE to see a recap of all of the giveaways and be sure to scroll down to Giveaway #7 where you can enter to win a $15 Gift Certificate to my shop!!! You have until midnight to enter so do it now before you forget!!!!

Thursday, October 27, 2011

Halloween Pictures from the Past

Today my mom emailed me this picture. This was back in 1984 (or 1985, we are not sure). Originally she told me she couldn't find one of me in the clown costume, but I am glad she did! I love that my mom almost always made our costumes.

 
 This one is one of my favorites, salt and pepper shakers. So creative.
 
I think this one is so funny. My little sister looks like such a sad clown. I like how my brother's shirt is only half tucked in and I love that I am wearing socks over my tights, so 80's. 

Oh the green carpet too. We lived in that house with the ugly green carpet for almost 20 years. Then when we went to sell it, we tore up the carpet to discover it had beautiful hardwood floors underneath.

Wednesday, October 26, 2011

Vintage Clown Costume and Replacing Old Elastic

 This was my brother back in 1982. Yep, 29 years ago, in a clown costume that my mom made.
 Don't you just love the shag carpet?

My mom kept this costume and gave it to me a couple of years ago for my daughter to wear. The collar was lost as well as the pom pom buttons. I made some new pom poms and  just glued them on.

I also made a new collar. I was lucky enough to find this yellow floral fabric at walmart that almost matched the yellow patch on the costume.
I
 I just made a large rectangle, sewed an elastic casing in the middle and then added some green ric rac to match the rest of the costume.


One thing that I did not do when my daughter wore it was replace the old elastic. We had to pin the neck together to keep it on her and the arms and legs were really loose.  I regretted not doing that.

Halloween 2009

My son will be wearing this costume for Halloween this year so I figured I better do it this time.

First I did the neck elastic. This one was really easy, The elastic was already sticking out a bit, so I just used a seam ripper to open it up a bit.

Pulled the old elastic out (I had to cut it since the ends were sewn together),

Then threaded some new elastic in, sewed the ends together by zig zagging back and forth a few times, and then closed up the casing again. Super easy.

Next was the sleeves and legs. These were a little bit more difficult because there wasn't a continuous elastic casing. The elastic was actually sewn into the seam. I don't like this kind of casing so I decided to take it out and change it.

Using a seam ripper, I opened up the seam just where the elastic and bias tape casing were attached,

Undid the stitches that held the elastic in the casing before the seam was sewn shut (those little white stitches in the picture)

and then a little of the casing on each side of the seam.

I sewed the seam back together again without the bias tape casing and ironed it open and flat.

 Then I folded the ends of the bias tape under so that the folded ends line up with the seam.


I sewed the casing back on, leaving the folded ends unsewn and open.

Then you can just slip the new elastic in through the opening, and thread it through.

I glued the ends together with a little fabric-tac to make it easier to sew.

 Then secured them together with a few zig zag stitches,

I then unbunched the the sleeve to pull the extra elastic in and it dissapeared into the casing. No need to sew up the opening.
I did the same thing for both arms and legs and then the costume was done and ready for Halloween!


 Much better


 Doesn't the little guy look adorable in it!

We can't wait for Halloween!!

Wednesday, October 19, 2011

Rapunzel Wig

I finally finished/came up with something that worked for my daughter's Rapunzel hair for Halloween to go with this dress. Its not perfect, but it works and that is all that matters.

I started by cutting long strands of yellow yarn. I am not sure how long they are because I did not measure, but I just cut them how long I thought the hair should be and then doubled it. I used one yarn piece as my "guide" for all the others, but they all still turned out very different lengths which is okay because I just gave it a trim after it was all put together. I cut 80 pieces total.

 I took the yarn, 5 pieces together at a time, and looped them around each other on a thin metal headband. 80 pieces gave me 16 loops on the headband. I used some hot dabs to keep the loops in place on the headband and keep them from sliding around or off the ends of the headband.
Then, I carefully combed the yarn with my fingers to make a low ponytail. If would have easier to do it on my daughter's head to see where it would look best (I think mine was too high), but she wouldn't hold still for long enough and I used my knee instead.
To help the headband stay on her head (the yarn is pretty heavy and the headband just kept slipping off) I sewed two hair combs onto the headband.  These grab onto her hair and keep it from slipping. (sorry this picture is so blurry!)

I attached a couple of pieces of ribbon to the ponytail and then carefully braided the yarn, trying to keep the ribbon in front so it showed. When I got to the end I used another hair elastic to secure it and then covered both elastics with some more ribbon. I hot glued a bunch of flowers to the braid trimmed the ends so they were even and then it is done!
 My daughter loves it although knowing my daughter, I doubt she will keep it on all night on Halloween. Do you see what I mean by why my ponytail should have been lower? If it was lower, then her hair would be covered up more in the back. Oh well, that is the risk I take by finishing it after she goes to bed and not being able to try it on her before I glued all the flowers on.
I tried to have her to do a pretty princess face for the camera, but this is all I got. Silly girl. She has not been liking the photo shoots lately. I may have come up with better bribes.

Sorry also for the lack of posts lately. We have been passing around a nasty cold virus. It gave my son a horrible rash. Luckily it is almost all cleared now except for his face. It still looks like a teenager acne face with little red bumps all over it. My poor little guy. 


Shared on 

Thursday, October 13, 2011

Tiny Bee Earrings

 The last time I ordered some silicone molds for my resin flowers, she offered me a free mold so I chose this cute tiny bee mold. I wasn't sure how they would turn out because they are a little flatter than my flowers, but I think they turned out cute.

 Their flatness makes them harder to sand flat because there is not much to grab on to, but I've made it work. I did notice that I sand a little bit of my nails off when I do it though. Oops!

 I just love how cute they are!! I think I might have to claim one of these pairs as my own :)

Monday, October 10, 2011

Blog Party at Family Ever After


My real life friend from college, Rachel, at Family Ever After is having an amazing one year blog birthday bash on her site. There are some great guest posts scheduled and 20 (yep 20!!!) giveaways this week. She will be posting twice each day (once in the morning, once in the afternoon) so be sure to check out all of the fun.

Definitely be sure to check it out Friday as that is day of my giveaway where you can enter to win a $15 gift certificate to my Etsy shop Ris C.  I'm so excited!

Friday, October 7, 2011

Dog Bed Pillow Recover

This is Taffy, our 5 year old Boston Terrier. She is the sweetest, funniest dog and we love her. She is great with kids and is such a good dog. When she was a puppy, we had issues. We could not get her to obey and she was so naughty. She would never come when we called her so we had to be careful to never let her escape out the front door. A year later, we got another dog, figuring she was just bored and needed a playmate. They were double the destruction, but we did learn one key thing from having a second dog. He was much more alert and would at least respond to us when we called him. He would bark at noises where Taffy never did. Turns out, she wasn't just not listening to us, she couldn't hear us. Taffy is deaf.

Now that we know this and have signs for different commands, she is much better. We had to put our second dog up for adoption over the summer because of his issues with little kids (among other things), but we can never give up our sweet Taffy.

My husband makes fun of me because I had a dog tag made for her that says "I AM DEAF."  He will call her by that every once in a while and he thinks it is hilarious. I just figured if she ever did escape or get lost, that it would be useful information for whoever found her.

Although her deafness has its challenges, it has some advantages too. She rarely barks, and when she does it is usually at some weird reflection or when she just waking up from a dream. She sleeps through everything, the train, the doorbell, and weird noises that normal dogs might freak out about. We love it!

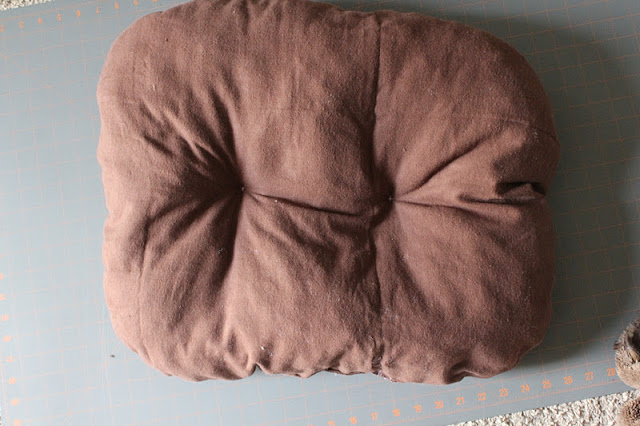
So anyways, the point of this post was to show you a pillow that I recovered for her.

A little while ago, we got her a fancy dog bed with soft fancy fabric and a pillow. She loves to get underneath things and cuddle in, so she gets inside her bed and sleeps underneath the pillow. Sometimes, besides hearing her snore, you can't even tell she is in it.

The problem with this "fancy" soft fabric was that is was so slippery, that the seam came apart and all the stuffing kept coming out and making a mess. We'd stuff it back in and close it up, but it would just come apart again.

So I found some cozy flannel fabric in the remnants section of the fabric store for a little over a buck and decided to just make her a new pillow.

 First I took all the stuffing out of the old one and saved it in a plastic bag. Then I doubled up my fabric and put the old pillow on top of it
Then I cut around it, leaving a seam allowance.

I sewed it all up, leaving an opening of about 6 inches.

I turned it right side out and then sewed two little "x's" into the top for tucks. I just eyeballed where these should go because it doesn't matter that much.

I shoved all the stuffing I had saved back in and then pinned the opening shut, being sure to fold the raw edges under.
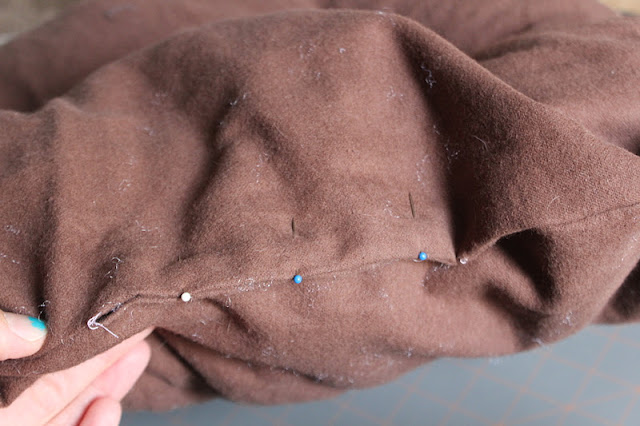
I

Then I just sewed the opening shut on my sewing machine, staying close to the edge, but not too close. Technically, I should have used thread that matched, but then you wouldn't be able to see it. I actually had to sew it twice because the first time I went too close to the edge and didn't catch both of the layers in some places.

Then it is done!

Super easy and quick. I think it only took me 20 minutes start to finish and that was with coming up from the basement (where my sewing table is) so I could take pictures in better light in between every step.


It fits perfectly and Taffy loves it. I had it down in the living room yesterday to see if she would use it and she lied down on it right away. I think that fact that I used the same stuffing that has her smell on it already helps. This morning when I went to let her out of her crate she was all cuddled underneath it. Success!! The best part is I won't have to clean up the stuffing every morning anymore :)

Linked up with: